Saturday, 14 June 2014
Friday, 28 February 2014
How to handle your studies effectively?
 When revising material, ask yourself questions that facilitate understanding. For example, if you are reading a section within a book, then ask yourself: “What are the main points / ideas of this section?”; “What is the author trying to tell me?”; “Why does the conclusion follow from the premise?” This will develop critical reasoning and enable you to summarise the section in your own words and style.
Friday, 21 February 2014
What the heat is???
Saturday, 18 January 2014
Elasto-Hydrodynamic lubrication (EHL)
Summary
In this article the summary of the developments about Elasto-hydrodynamic lubrication (EHL) is given. Two types; starved EHL and grease EHL are highlighted in this article. EHL is the type of lubrication that occurs in lubricated contra formal contacts where the elastic deformation of the lubricated surfaces has a substantial influence on the thickness of the lubricating film. EHL is very important in order to produce less expensive, more efficient and environment friendly products. The history of EHL started when Reynolds derived the differential equation describing the pressure distribution and load carrying capacity of lubricating films for journal bearings. Later on many scientists proposed many procedures to explain full film lubrication and finally the concept of amplitude reduction opened the possibilities to apply EHL theory to real surface roughness by means of fast Fourier transform methodology.
This paper describes the relationship of lubricant’s density with temperature and its pressure. It is to be noted that density variation with respect to temperature change is not considered in this paper. Density variation with pressure is nearly linear at low pressure. This paper also gives a brief review about the numerical method that are used to solve the mathematical problems regarding EHL. But due to high computing costs and solution convergence issues engineer tries to find the analytical solutions to these equations. The calculation of reduced pressure, dimensionless pressure and thickness of the thin film is done by considering simple assumptions regarding lubricant and applying Reynolds equation. This method does not provide the information about the exact thickness of film and also unable to identify its location. To overcome this problem, Greenwood introduced another assumption that the pressure and its distribution can be approximated by considering the elastic solution. To evaluate the outlet pressure he referred the concepts of fracture mechanics. After that paper describes some techniques which are used to measure the thickness of the film. This can be done by using high resolution and slow speed cameras. In this technique, it is necessary that one of meeting surfaces must be transparent.
As we are reviewing the Elasto-Hydrodynamic lubrication theory, so it is important to analyze it from different aspects. One of the most important factor is 'Inlet Shear heating'. When a bearing operates, then the lubricant is squeezed due to load supported by bearing. But the journal within the bearing not only rotates but also slides to some extent. Due to this sliding action some of the fluid is rejected back to its earlier position, at the point of contact. This rejected fluid slides over the incoming fluid, due to which heat is generated within the lubricant due to shear effect. This shear heating effect must be considered for proper review of EHL theory.
Actually classical EHL theory is based on Newtonian fluid. In other words the temperature rise due to sliding is not considerd. This theory fails in the case of sliding. So to predict the accurate results, non-newtonian fluid must be considered with implementation of energy equation for the calculation of temperature. 'Kim' reduced the 3D heat transfer problem to 2D by assuming parabolic distribution of temperature across the film thickness, but this leads to inaccurate results.
The prediction of friction at point of contact is also important. The main cause of friction is the sliding of boundary layer on bearing. Also the surface topography plays important role in analyzing the friction. To predict the generated temperature several models are proposed. One of them is the 'one point model'. Firstly a researcher 'Jacod' reported master curves determined by interpolating the data using numerical techniques. After that, these master curves are used to determine the situation of parameters at point of contact, so geometry of contact becomes irrelevant. Also two dimensional model is proposed which considers oil conduction along the normal direction, by discretizing the geometry of contact and evaluating the heat at discrete points.
During its operation, some pressure waves are generated within the lubricant due to applied load. These waves decays with displacement from point of contact. It is predicted that this decay is exponential. So to properly review the EHL theory it is necessary to consider the effect of these pressure/discontinuties waves by expressing there parametrs in a function which is used to calculate the pressure.
The analysis of dimpled surface is also necessary to understand the EHL theory properly. It is investigated that, specimens with isotropic surfaces are better than superfinished specimens, when subjected to peeling test. Actually dimpled surfaces would induce pressure spikes, resulting in concentrated stresses. These stresses are the main cause of crack within the bearing. But in some cases, the lubricant fills the pits and try to enhance the revolution of journal within the bearing. This case is true for starved lubrication. Sometimes the pits are intentionally introduced to overcome the danger of starved lubrication.
Moreover in this paper, all the historical work done on the topic is discussed and their limitations as well. The limitations were present due to the fact that the factors like fatigue, pressure, EHL, Micro EHL were evaluated simultaneously particularly in a competitive to the failure. With the each new consideration a new model was developed like, Molecular dynamic model, CFD and Thin-film fluid model. However several phenomena are still undiscovered. Finally in this paper it is hoped that the engineers may find these three models working together to explore the failure of lubrication film in near future.
Thursday, 16 January 2014
Flexible Manufacturing Systems
Sections:
1.What is a Flexible Manufacturing System?
2.FMS Components
3.FMS Applications and Benefits
4.FMS Planning and Implementation Issues
5.Quantitative Analysis of Flexible Manufacturing Systems
Where to Apply FMS Technology
If
-the plant presently either:
–Produces parts in batches or
–Uses manned GT cells and management wants to automate the cells
-It must be possible to group a portion of the parts made in the plant into part families
–The part similarities allow them to be processed on the FMS workstations
-Parts and products are in the mid-volume, mid-variety production range
Flexible Manufacturing System - Defined
A highly automated GT machine cell, consisting of a group of processing stations (usually CNC machine tools), interconnected by an automated material handling and storage system, and controlled by an integrated computer system
-The FMS relies on the principles of GT
–No manufacturing system can produce an unlimited range of products
–An FMS is capable of producing a single part family or a limited range of part families
Flexibility Tests in an Automated Manufacturing System
To qualify as being flexible, a manufacturing system should satisfy the following criteria (“yes” answer for each question):
1.Can it process different part styles in a non‑batch mode?
2.Can it accept changes in production schedule?
3.Can it respond gracefully to equipment malfunctions and breakdowns?
4.Can it accommodate introduction of new part designs?
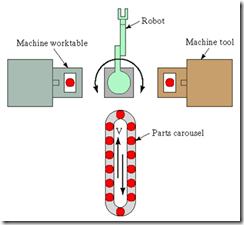
Automated manufacturing cell with two machine tools and robot. Is it a flexible cell?
Is the Robotic Work Cell Flexible?
1.Part variety test
–Can it machine different part configurations in a mix rather than in batches?
2.Schedule change test
–Can production schedule and part mix be changed?
-Is the Robotic Work Cell Flexible?
3.Error recovery test
-Can it operate if one machine breaks down?
•Example: while repairs are being made on the broken machine, can its work be temporarily reassigned to the other machine?
4.New part test
–As new part designs are developed, can NC part programs be written off‑line and then downloaded to the system for execution?
Types of FMS
•Kinds of operations
–Processing vs. assembly
–Type of processing
•If machining, rotational vs. non-rotational
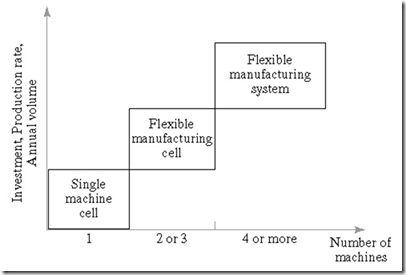
•Number of machines (workstations):
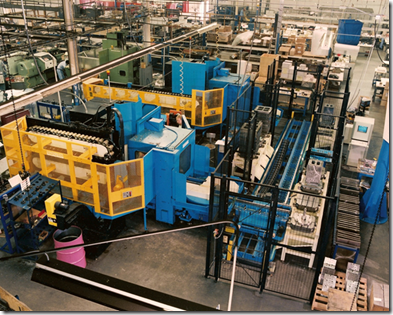
1.Single machine cell (n = 1)
2.Flexible manufacturing cell (n = 2 or 3)
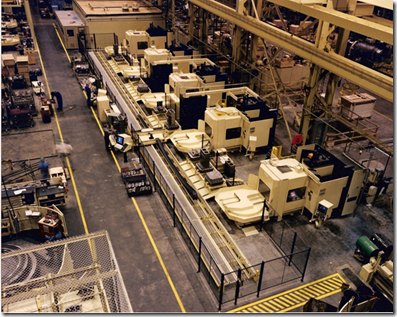
3.Flexible manufacturing system (n = 4 or more)
Single-Machine Manufacturing Cell
A single-machine CNC machining cell (photo courtesy of Cincinnati Milacron)
Flexible Manufacturing Cell
A two-machine flexible manufacturing cell for machining (photo courtesy of Cincinnati Milacron)
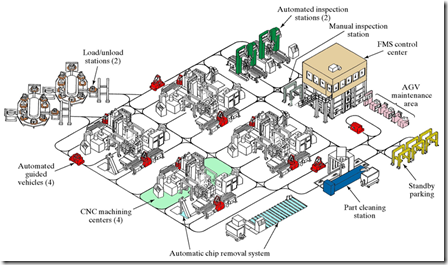
A five-machine flexible manufacturing system for machining (photo courtesy of Cincinnati Milacron)
Features of the Three Categories
FMS Types
Level of Flexibility
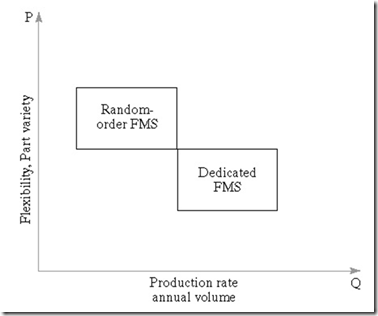
1.Dedicated FMS
–Designed to produce a limited variety of part styles
–The complete universe of parts to be made on the system is known in advance
–Part family likely based on product commonality rather than geometric similarity
2.Random-order FMS
–Appropriate for large part families
–New part designs will be introduced
–Production schedule is subject to daily changes
•Dedicated vs. Random-Order FMSs
FMS Components
1.Workstations
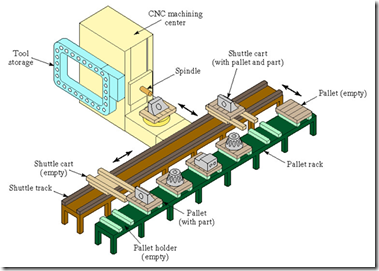
2.Material handling and storage system
3.Computer control system
4.Human labor
Workstations
•Load and unload station(s)
–Factory interface with FMS
–Manual or automated
–Includes communication interface with worker to specify parts to load, fixtures needed, etc.
•CNC machine tools in a machining type system
–CNC machining centers
–Milling machine modules
–Turning modules
•Assembly machines
Material Handling and Storage
•Functions:
–Random, independent movement of parts between stations
–Capability to handle a variety of part styles
•Standard pallet fixture base
•Workholding fixture can be adapted
–Temporary storage
–Convenient access for loading and unloading
–Compatibility with computer control
•Material Handling Equipment
•Primary handling system establishes basic FMS layout
•Secondary handling system - functions:
–Transfers work from primary handling system to workstations
–Position and locate part with sufficient accuracy and repeatability for the operation
–Reorient part to present correct surface for processing
–Buffer storage to maximize machine utilization
Five Types of FMS Layouts
•The layout of the FMS is established by the material handling system
•Five basic types of FMS layouts
1.In‑line
2.Loop
3.Ladder
4.Open field
5.Robot‑centered cell
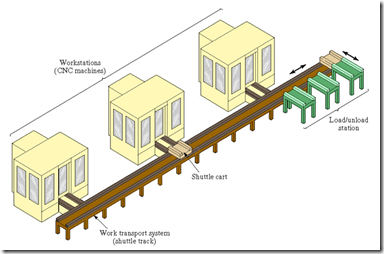
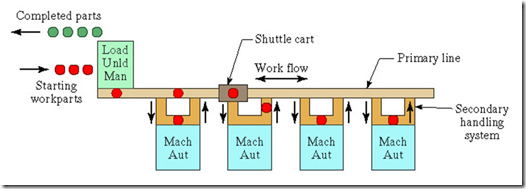
•FMS In-Line Layout
•Straight line flow, well-defined processing sequence similar for all work units
•Work flow is from left to right through the same workstations
•No secondary handling system
•Linear transfer system with secondary parts handling system at each workstation to facilitate flow in two directions
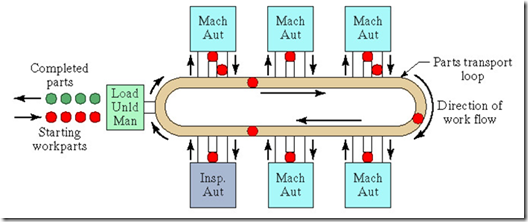
•FMS Loop Layout
•One direction flow, but variations in processing sequence possible for different part types
•Secondary handling system at each workstation
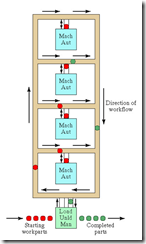
•FMS Rectangular Layout
•Rectangular layout allows recirculation of pallets back to the first station in the sequence after unloading at the final station
•FMS Ladder Layout
•Loop with rungs to allow greater variation in processing sequence
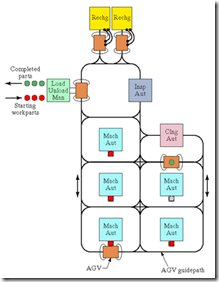
•FMS Open Field Layout
•Multiple loops and ladders, suitable for large part families
•Robot-Centered Cell
•Suited to the handling of rotational parts and turning operations
FMS Computer Functions
1.Workstation control
–Individual stations require controls, usually computerized
2.Distribution of control instructions to workstations
–Central intelligence required to coordinate processing at individual stations
3.Production control
–Product mix, machine scheduling, and other planning functions
4.Traffic control
–Management of the primary handling system to move parts between workstations
5.Shuttle control
–Coordination of secondary handling system with primary handling system
6.Workpiece monitoring
–Monitoring the status of each part in the system
•FMS Computer Functions
7.Tool control
–Tool location
•Keeping track of each tool in the system
–Tool life monitoring
•Monitoring usage of each cutting tool and determining when to replace worn tools
8.Performance monitoring and reporting
–Availability, utilization, production piece counts, etc.
9.Diagnostics
–Diagnose malfunction causes and recommend repairs
Duties Performed by Human Labor
•Loading and unloading parts from the system
•Changing and setting cutting tools
•Maintenance and repair of equipment
•NC part programming
•Programming and operating the computer system
•Overall management of the system
FMS Applications
•Machining – most common application of FMS technology
•Assembly
•Inspection
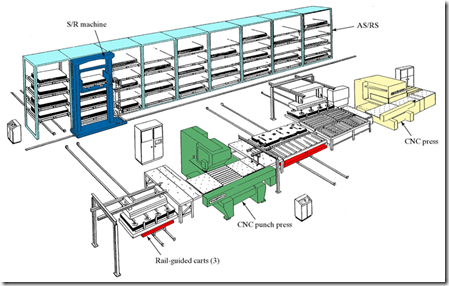
•Sheet metal processing (punching, shearing, bending, and forming)
•Forging
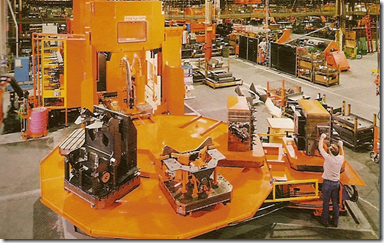
•FMS at Chance-Vought Aircraft (courtesy of Cincinnati Milacron)
FMS for Sheet Metal Fabrication
FMS Benefits
•Increased machine utilization
–Reasons:
•24 hour operation likely to justify investment
•Automatic tool changing
•Automatic pallet changing at stations
•Queues of parts at stations to maximize utilization
•Dynamic scheduling of production to account for changes in demand
•Fewer machines required
•Reduction in factory floor space required
•FMS Benefits
•Greater responsiveness to change
•Reduced inventory requirements
–Different parts produced continuously rather than in batches
•Lower manufacturing lead times
•Reduced labor requirements
•Higher productivity
•Opportunity for unattended production
–Machines run overnight ("lights out operation")
FMS Planning and Design Issues
•Part family considerations
–Defining the part family of families to be processed
•Based on part similarity
•Based on product commonality
•Processing requirements
–Determine types of processing equipment required
•Physical characteristics of workparts
–Size and weight determine size of processing equipment and material handling equipment
•Production volume
–Annual quantities determined number of machines required
•Types of workstations
•Variations in process routings
•Work-in-process and storage capacity
•Tooling
•Pallet fixtures
FMS Operational Issues
•Scheduling and dispatching
–Launching parts into the system at appropriate times
•Machine loading
–Deciding what operations and associated tooling at each workstation
•Part routing
–Selecting routes to be followed by each part
•
•FMS Operational Issues
•Part grouping
–Which parts should be on the system at one time
•Tool management
–When to change tools
•Pallet and fixture allocation
–Limits on fixture types may limit part types that can be processed
•Quantitative Analysis of
Flexible Manufacturing Systems
•FMS analysis techniques:
1.Deterministic models
2.Queueing models
3.Discrete event simulation
4.Other approaches, including heuristics
•Deterministic models
1.Bottleneck model - estimates of production rate, utilization, and other measures for a given product mix
2.Extended bottleneck model - adds work-in-process feature to basic model
•For a given part mix, the total production rate is ultimately limited by the bottleneck station
•If part mix ratios can be relaxed, it may be possible to increase total FMS production rate by increasing the utilization of non-bottleneck stations
•As a first approximation, bottleneck model can be used to estimate the number of servers of each type to achieve a specified overall production rate
COMBINED LOADING
PRACTICALLY IT CAN BE OBSERVED THAT STRUCTURAL MEMBERS / COMPONENTS ARE REQUIRED TO RESIST MORE THAN ONE TYPE OF LOADING. FOR EXAMPLE, A SHAFT IN TORSION MAY ALSO BE SUBJECTED TO BENDING, OR A BEAM MAY BE SUBJECTED TO THE SIMULTANEOUS ACTION OF THE BENDING MOMENTS AND AXIAL FORCES. THE STRESS ANALYSIS OF A MEMBER SUBJECTED TO SUCH LOADING CONDITIONS (COMBINED LOADINGS) CAN BE CARRIED OUT BY SUPERIMPOSING THE STRESSES DUE TO EACH LOAD ACTING SEPARATELY. HOWEVER, SUPERIMPOSING CAN ONLY BE PERFOMED IF THE STRESSES ARE LINEAR FUNCTIONS OF THE LOADS AND IF THERE IS NO INTERACTION EFFECTS BETWEEN VARIOUS LOADS. SUCH TYPE OF SITUATION CAN ONLY BE ACHIEVED IF THE DEFLECTIONS AND ROTATIONS OF THE STRUCTURES ARE SMALL. ANALYSIS BY THE PROCESS OF SUPERIMPOSING BEGINS WITH THE DETERMINATION OF THE STRESSES DUE TO THE AXIAL FORCES, TORQUES, SHEAR FORCES, AND BENDING MOMENTS. AFTER DETERMINATION THESE STRESSES ARE COMBINED TO OBTAIN THE RESULTANT STRESSES, AFTER WHICH THE STRESSES ACTING IN INCLINED DIRECTIONS ARE INVESTIGATED BY STRESS TRANSFORMATION EQUATIONS. FINALLY THE PRINCIPAL STRESSES AND MAXIMUM SHEAR STRESSES DUE TO COMBINED LOADING ARE DETERMINED. IN BRIEF THE FOLLOWING THREE-STEP PROCEDURE WILL BE USEFUL IN SOLVING FOR STRESSES DUE TO COMBINED LOADING
1. DETERMINE THE INTERNAL RESULTANTS
THIS INVOLVES DRAWING FREE-BODY DIAGRAM AND WRITING EQUILIBRIUM EQUATIONS AS HAD BEEN DISCUSSED IN CASE OF INDETERMINATE STRUCTURES.
2. CALCULATE THE INDIVIDUAL STRESSES
FORMULAS AS LISTED BELOW ARE USED TO COMPUTE THE STRESS DISTRIBUTIONS THAT RESULT FROM THE VARIOUS STRESS RESULTANTS.
| STRESS RESULTANT | SYMBOL | FORMULA |
| NORMAL FORCE | F | σ = F/A |
| TORSIONAL MOMENT | T | τ = Tρ / Ip |
| BENDING MOMENT | M | σ = My/I |
| TRANSVERSE SHEAR FORCE | V | τ = VQ / It |
3. COMBINE THE INDIVIDUAL STRESSES
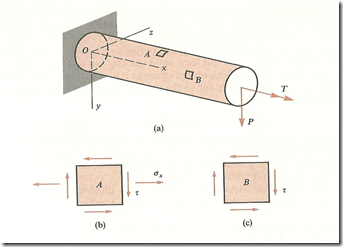
THIS STEP GENERALLY INVOLVES ALGEBRICALLY SUMMING LIKE STRESSES AND IN MOST CASES PRINCIPAL STRESSES AND MAXIMUM SHEAR STRESSES ARE CALCULATED. CONSEQUENTLY, EITHER THE ADEQUACY OF THE DESIGN IS CONFIRMED, OR IF THE STRESSES ARE TOO LARGE OR TOO SMALL DESIGN CHANGES NEEDED ARE IDENTIFIED. TO ELABORATE THIS DEFINED MECHANISM OF ANALYSIS, LET US CONSIDER A SOLID CIRCULAR CANTILEVER BAR. THIS BAR IS LOADED AT THE FREE END BY A TWISTING COUPLE “T” AND A LATERAL LOAD “P” WHICH CAUSES BENDING. THESE TWO LOADS PRODUCE A BENDING MOMENT (M), A SHEAR FORCE (V), AND A TWISTING COUPLE (T) AT EVERY X-SECTION OF THE STRUCTURE, EACH OF WHICH PRODUCES STRESSES ACTING OVER THE CROSS SECTIONS.
MOREOVER, BENDING MOMENT (M), SHEAR FORCE (V) AND TWISTING COUPLE (T) PRODUCE STRESSES ACTING OVER THE CROSS SECTIONS OF THE STRUCTURES. NOW IF WE ISOLATE STRESS ELEMENT “A” AT THE TOP OF THE BAR, IT CAN BE OBSERVED THAT THIS ELEMENT IS SUBJECTED TO BENDING AND SHEAR STRESSES WHICH CAN BE CALCULATED BY THE FOLLOWING RELATIONSHIPS:
σx = M r/ I AND τ = T r / Ip
IT CAN ALSO BE OBSERVED THAT AT THE TOP OF THE ELEMENT THERE ARE NO SHEAR STRESSES ASSOCIATED WITH SHEAR FORCE “V”. THUS A PLANE STRESS SITUATION IS OBTAINED. AFTER DETERMINING THE VALUES OF “σx” AND “τ”, WE CAN DETERMINE THE STRESSES ON AN ELEMENT ROTATED THROUGH ANY DESIRED ANGLE. THEREFORE, THE MAXIMUM AND MINIMUM NORMAL STRESSES AT POINT “A”, IN OTHER WORDS THE PRINCIPAL STRESSES, AND ALSO THE MAXIMUM SHEAR STRESS CAN OBTAINED BY THE FOLLOWING RELATIONSHIPS:
σ1,2 = σx /2 ± √(σx/2)² + τ²
τmax = √(σx/2)² + τxy²
THESE CALCULATED MAXIMUM VALUES OF STRESSES CAN BE COMPARED WITH THE ALLOWABLE NORMAL AND SHEAR STRESSES WHILE CHECKING THE ADEQUACY AND RELIABILITY OF BAR. IT MUST ALSO BE OBSERVED THAT THE STRESSES ARE LARGEST WHEN THE ELEMENT “A” IS LOCATED AT THE FIXED END OF THE BEAM WHERE THE BENDING MOMENT HAS ITS MAXIMUM VALUE. HENCE THE TOP OF THE BEAM AT THE SUPPORT IS ONE OF THE CRITICAL POINTS WHERE THE STRESSES MUST BE INVESTIGATED. ANOTHER CRITICAL POINT IS ON THE SIDE OF THE BAR AT THE NEUTRAL AXIS . AT THIS POINT THE BENDING STRESS IS ZERO BUT THE SHEAR STRESS PRODUCED BY THE SHEAR FORCE “V” HAS ITS LARGEST VALUE. THIS MEANS THAT THIS IS THE STATE OF PURE SHEAR WITH RESULTANT SHEAR STRESS CONSISTING OF TWO PARTS; FIRST THE SHEAR STRESS DUE TO THE TORQUE AND THE OTHER DUE TO THE SHEAR FORCE “V”. SHEAR STRESS DUE TO THE TORQUE “T” AND SHEAR STRESS DUE TO THE SHEAR FORCE ”V” APPLIED ON THE SHAFT CAN BE OBTAINED BY THE FOLLOWING RELATIONSHIPS: (SOLID SHAFT IN CASE OF SHEAR FORCE)
τ1 = Tr/Ip AND τ2 = 4V / 3A
TOTAL SHEAR STRESS = τ = τ1 + τ2
AS THE PRINCIPAL STRESSES OCCUR ON PLANES AT 45º TO THE AXIS AND HAVE THE SAME MAGNITUDES AS THE SHEAR STRESS ITSELF. THEREFORE,
σ1,2 = ±τ
THESE MAXIMUM NORMAL AND SHEAR STRESSES SHOULD BE COMPARED WITH THOSE OBTAINED FOR ELEMENTS AT THE TOP AND BOTTOM OF THE BAR IN ORDER TO ASCERTAIN THE ABSOLUTE MAXIMUM STRESSES FOR USE IN DESIGN. IN FACT THE VARIETY OF PRACTICAL SITUATIONS IS SEEMINGLY ENDLESS, SO IT NOT WORTHWHILE TO DERIVE SPECIFIC FORMULAS FOR DESIGN USE. INSTEAD IN CASE OF COMBINED LOADING EACH STRUCTURE IS ANALYZED AT VARIOUS CRITICAL POINTS AND THE RESULTS ARE COMPARED. WHEN SELECTING THE POINTS TO BE INVESTIGATED, IT IS NATURAL TO CHOOSE THOSE LOCATIONS WHERE EITHER THE NORMAL OR THE SHEAR STRESSES ARE MAXIMUM.
Wednesday, 15 January 2014
SHAFT ALIGNMENT
One of the most important maintenance operation is shaft alignment. Approximately 50% of all costs related to breakdowns of machines with rotating shafts are caused by misalignment.
Types of misalignments:
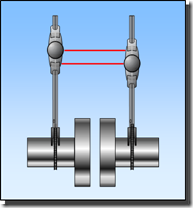
1- Angular misalignment
2- Parallel misalignment
Misalignment means:
Increased bearing load, Reduction of bearing life, Increased wear of seals, bearings and couplings, Increased vibrations, Increased noise, Increased energy consumption, Shaft failures.
Bearing Fatigue:
A 20% load increase from misalignment reduces the calculated bearing life by almost 50%!
Main applications of shaft alignment:
Electric motors, Turbines, Electric generators, Pumps, Blowers and fans, Compressors, Gearboxes
Some Rough alignment methods:
1- Visual 2- Feeler gauges
The main advantage of above mentioned methods is speed. On the other hand, disadvantage is poor accuracy.
Dial indicators method:
1- Reversed indicator method 2- Rim and face method
The main advantage of this method is accuracy but it is relatively time consuming.
Laser shaft alignment method:
It is an accurate as well as less time consuming method.
Requirements for laser alignment equipment:
extended personal customer visits, complete demonstration
and training, expert salespeople and/or product managers.
Many customers who need alignment but use traditional methods because they think that laser alignment is very expensive!
Big customers who use only one advanced laser shaft alignment system because of the price but they actually need more.
SKF shaft alignment series:
USER FRIENDLY TOOL:
only five buttons to operate, interactive display, standard with a printer, clear printout for documentation, easy fitting with chain, fixtures, less components, very descriptive manual.
LESS COMPONENTS:
display unit, printer, 2 measuring units with spirit levels and cables, chain fixtures, measuring tape, set of shims.


