Saturday 18 January 2014

Elasto-Hydrodynamic lubrication (EHL)

Summary

In this article the summary of the developments about Elasto-hydrodynamic lubrication (EHL) is given. Two types; starved EHL and grease EHL are highlighted in this article. EHL is the type of lubrication that occurs in lubricated contra formal contacts where the elastic deformation of the lubricated surfaces has a substantial influence on the thickness of the lubricating film. EHL is very important in order to produce less expensive, more efficient and environment friendly products. The history of EHL started when Reynolds derived the differential equation describing the pressure distribution and load carrying capacity of lubricating films for journal bearings. Later on many scientists proposed many procedures to explain full film lubrication and finally the concept of amplitude reduction opened the possibilities to apply EHL theory to real surface roughness by means of fast Fourier transform methodology.

This paper describes the relationship of lubricant’s density with temperature and its pressure. It is to be noted that density variation with respect to temperature change is not considered in this paper. Density variation with pressure is nearly linear at low pressure. This paper also gives a brief review about the numerical method that are used to solve the mathematical problems regarding EHL. But due to high computing costs and solution convergence issues engineer tries to find the analytical solutions to these equations. The calculation of reduced pressure, dimensionless pressure and thickness of the thin film is done by considering simple assumptions regarding lubricant and applying Reynolds equation. This method does not provide the information about the exact thickness of film and also unable to identify its location. To overcome this problem, Greenwood introduced another assumption that the pressure and its distribution can be approximated by considering the elastic solution. To evaluate the outlet pressure he referred the concepts of fracture mechanics. After that paper describes some techniques which are used to measure the thickness of the film. This can be done by using high resolution and slow speed cameras. In this technique, it is necessary that one of meeting surfaces must be transparent.

As we are reviewing the Elasto-Hydrodynamic lubrication theory, so it is important to analyze it from different aspects. One of the most important factor is 'Inlet Shear heating'. When a bearing operates, then the lubricant is squeezed due to load supported by bearing. But the journal within the bearing not only rotates but also slides to some extent. Due to this sliding action some of the fluid is rejected back to its earlier position, at the point of contact. This rejected fluid slides over the incoming fluid, due to which heat is generated within the lubricant due to shear effect. This shear heating effect must be considered for proper review of EHL theory.

Actually classical EHL theory is based on Newtonian fluid. In other words the temperature rise due to sliding is not considerd. This theory fails in the case of sliding. So to predict the accurate results, non-newtonian fluid must be considered with implementation of energy equation for the calculation of temperature. 'Kim' reduced the 3D heat transfer problem to 2D by assuming parabolic distribution of temperature across the film thickness, but this leads to inaccurate results.

The prediction of friction at point of contact is also important. The main cause of friction is the sliding of boundary layer on bearing. Also the surface topography plays important role in analyzing the friction. To predict the generated temperature several models are proposed. One of them is the 'one point model'. Firstly a researcher 'Jacod' reported master curves determined by interpolating the data using numerical techniques. After that, these master curves are used to determine the situation of parameters at point of contact, so geometry of contact becomes irrelevant. Also two dimensional model is proposed which considers oil conduction along the normal direction, by discretizing the geometry of contact and evaluating the heat at discrete points.

During its operation, some pressure waves are generated within the lubricant due to applied load. These waves decays with displacement from point of contact. It is predicted that this decay is exponential. So to properly review the EHL theory it is necessary to consider the effect of these pressure/discontinuties waves by expressing there parametrs in a function which is used to calculate the pressure.

The analysis of dimpled surface is also necessary to understand the EHL theory properly. It is investigated that, specimens with isotropic surfaces are better than superfinished specimens, when subjected to peeling test. Actually dimpled surfaces would induce pressure spikes, resulting in concentrated stresses. These stresses are the main cause of crack within the bearing. But in some cases, the lubricant fills the pits and try to enhance the revolution of journal within the bearing. This case is true for starved lubrication. Sometimes the pits are intentionally introduced to overcome the danger of starved lubrication.

Moreover in this paper, all the historical work done on the topic is discussed and their limitations as well. The limitations were present due to the fact that the factors like fatigue, pressure, EHL, Micro EHL were evaluated simultaneously particularly in a competitive to the failure. With the each new consideration a new model was developed like, Molecular dynamic model, CFD and Thin-film fluid model. However several phenomena are still undiscovered. Finally in this paper it is hoped that the engineers may find these three models working together to explore the failure of lubrication film in near future.

eDrawings for Android

Imagine you are going to purchase a part from another country for a partimageicular task. Although you know the function performed by the part when installed on assigned place but there is a question. How this part looks like? Through which mechanism, the corresponding part perform the required task?

The integration of computers with graphical capabilities is the best solution to this problem. Now, by using 3-D modeling softwares, not only one can develop a 3-D model but also the transmission of this model in the form of e-file is as easy as drinking the water in front of sweet water fountain.

But the global community is still feeling that something is missing. The modern society is now using micro devices like smart phones, tablets etc. They need something so that they can view the 3-D models on their micro-devices.

As we can see that with respect to smart devices operating systems ‘ANDROID’ is the most powerful and biggest stakeholder. But unfortunately, the global community using android technology is restricted with respect to 3-D viewing capabilities. Now this dead front is over, and the credit goes to SolidWorks for introducing eDrawings viewer for android operating systems.

Now the eDrawings viewer is available on Google play store. It can be downloaded from the following link:

https://play.google.com/store/apps/details?id=com.solidworks.eDrawingsAndroid

eDrawings viewer is a sophisticated android app aiming at providing the all viewing facilities with respect to three dimensional models. With the help of this app you can view different parts created in SolidWorks as well as the assemblies. This app is capable of transforming the e-file into readable format. Also this app is capable of producing the drawings with transferable format.

This app is designed by keeping in view the fully integrated touch technology. You can pan, zoom, rotate model with the swipe of just a finger. So you can say that this app just a step to transform the e drawings into physically touchable things (in a sense).

Here are some of the features of this great app announced by SolidWorks blog:

  • Intuitive and easy-to-use user interface
  • Open 3D (EASM, EPRT, SLDASM, SLDPRT), 2D (EDRW, SLDDRW) and associated files from any source: email attachments, cloud storage services (Dropbox, SkyDrive, Google Drive, Hightail, and others), Web and FTP sites and network folders.
  • Zoom, pan and rotate your 2D or 3D CAD data using multi-touch
  • Animate 3D standard views
  • Browse your 2D drawing sheets
  • View your designs in full screen and double tap to fit it on screen
  • Sample files included

Here are some requirements to run this application:

eDrawings for Android supports any Android device running Android 4.0 or higher. It is optimized for use with 7″ – 10″ tablets form factors, including the Google Nexus 7, Google Nexus 10, Samsung Galaxy Tab 7 and Samsung Galaxy Tab 10.

So to enhance the experience of 3-D modeling it is recommended to download and install this app immediately on your android device and enjoy the 3-D models library of SolidWorks.

Review By: Engr. Ammar Aziz (BS-Mechanical Engineering)

Thursday 16 January 2014

Simulation of Impact of PET venturi tube with rigid floor


Date: Tuesday, May 07, 2013
Designer: Ammar Aziz                                                                                                          
Study name: Impact testing by Ammar                                                                             Analysis type: Drop Test

Disclaimer: The results of this simulation can not be used for any practical implementation.

image

Solid Body

Document Name and Reference

Treated As

Volumetric Properties

Document Path/Date Modified

Venturi Impact

Solid Body

Mass:0.190265 kg

Volume:0.00013399 m^3

Density:1420 kg/m^3

Weight:1.8646 N


May 07 12:56:49 2013


Study Properties

Study name

Venturi Impact

Analysis type

Drop Test

Mesh type

Solid Mesh

Large displacement

On

Result folder

SolidWorks document


Setup Information

Type

Drop height

Drop Height from Centroid

2000 mm

Gravity

9.81 m/s^2

Gravity Reference

Top Plane

Friction Coefficient

0

Target Stiffness

Rigid target

Critical Damping Ratio

0

Drop height is selected from the automatically detected geometric center of tube to the floor surface. So please not confuse this length with the distance between the lower portion of tube and floor surface 

Also the friction between the tube and floor is neglected. This assumption is based on another assumption that tube is falling perfectly vertically, so that there is no side thrust which enhances the friction process during the impact.

The floor is assumed to be rigid. It implies all the potential energy of the tube is dissipated into the floor without any rejection of energy by floor back to tube.


Result Options

Solution Time After Impact

130.7 microsec

Save Results Starting From

0 microsec

No. of Plots

25

No. of Graph Steps Per Plot

20

Number of vertex

0

The simulated result span is b/w time of impact to 130 lacth second after the impact

Units

Unit system:

SI (MKS)

Length/Displacement

mm

Temperature

Kelvin

Angular velocity

Rad/sec

Pressure/Stress

N/mm^2 (MPa)

Material Properties

Model Reference

Properties

Components

Name:

PET

Model type:

Linear Elastic Isotropic

Default failure criterion:

Unknown

Tensile strength:

5.73e+007 N/m^2

Compressive strength:

9.29e+007 N/m^2

Elastic modulus:

2.96e+009 N/m^2

Poisson's ratio:

0.37

Mass density:

1420 kg/m^3

SolidBody 1(Shell3)(venturi tube)

The model is assumed to be linear elastic and isotropic. It implies Hook’s law is valid during the entire simulation. Elastic modulus of material is approximately 3GPa.


Mesh Information

Mesh type

Solid Mesh

Mesher Used:

Standard mesh

Automatic Transition:

Off

Include Mesh Auto Loops:

Off

Jacobian points

4 Points

Element Size

0.00511862 m

Tolerance

0.000255931 m

Mesh Quality

High

Mesh Information - Details

Total Nodes

13311

Total Elements

15359

Maximum Aspect Ratio

5.3887

% of elements with Aspect Ratio < 3

99.5

% of elements with Aspect Ratio > 10

0

% of distorted elements(Jacobian)

0

Time to complete mesh(hh;mm;ss):

00:00:21

It is a fine mesh with no distorted element. All the elements are less than aspect ratio of 3. Approximately 13 thousand nodes. So a good solution is expected.

image

Study Results

Name

Type

Min

Max

Stress1

VON: von Mises Stress

1.50947 N/mm^2 (MPa)

Node: 1927

35.3117 N/mm^2 (MPa)

Node: 7042

image

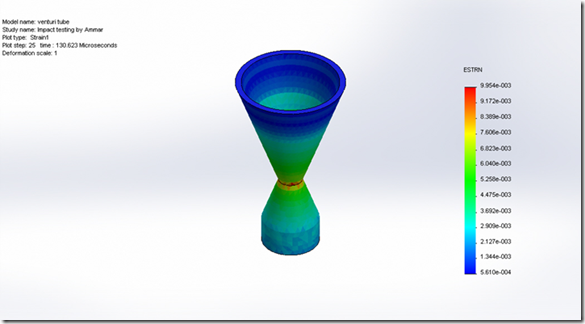
As the maximum stress generated due to impact is approximately 35 MPa which is well below the tensile strength of 3GPa. So our model is safe. But the neck is critical is the tube falls from more high heights.

Name

Type

Min

Max

Strain1

ESTRN: Equivalent Strain

0.000561001

Element: 2362

0.00995434

Element: 3707

image

Conclusion:

you can see the most sensitive location is the neck of venturi tube if it falls from certain height vertically according to above scheme.

Disclaimer:

This simulation is just to describe the capability of solid works to simulate the impact test. Also it encourages the sound theoretical knowledge development. 

What is Dielectrophoresis? How it is important to separate, diagnose and control the human blood cells with the diseased cells?

Dielectrophoresis
Actually when a dielectric particle is subjected to a non-uniform electric-field, it
experiences a force. The charge on that particle is not the main cause of this phenomenon, as we might expect. Because non-charged particles also experience the same sort of force when subjected to non-uniform magnetic field. The strength of the force depends upon the medium in which that particle is placed and particle’s electric properties. This force also depends upon the shape and size of the particle.

The consequence of our above interpretation is that as this force is shape and size dependent, so it is reasonable to assume that the two particles with different size/shape experience different magnitude of force when subjected to non-uniform magnetic field. By using this force, it is obvious that we can separate the particles of different sizes with a great accuracy. This force can also be used for orienting the particles with particular shape/size according to requirement.
 
Reason of Dielectrophoresis
Dielectrophoresis occurs when a body is suspended in a non-uniform electric field. Under the action of this non-uniformity of electric field, the body is polarized. In other words, the oppositely charged atomic particles, which constitute that body, are accumulated on the opposite corners of the body. Note that it is not necessary for the body to be already charged before exposure to non-uniform magnetic field. Due to this pole formation, the body experiences a force along the electric field lines. As the field is non-uniform so under the action of this force the body moves along the electric field lines.

image
                                   Fig (1): Step by Step illustration

Dielectrophoresis Implementation for diagnosing, separating and controlling the viable cells. Dielectrophoresis is a well-established and effective means for the manipulation of viable cells. Various applications have been found, ranging from electro fusion, to individual cell manipulation, and to differential separation from cell mixtures. Its effectiveness, however greatly depends upon the utilization of very low electrical conductivity media.

Actually blood is also a combination of particles. The basic unit of blood is blood cell. The shape/size of blood cells in a blood of a healthy person is almost identical. But when this healthy person is attacked by some disease, then these cells fight a fierce battle with the germs of that disease. As a result of which the shape of blood cell is changed and they become distorted. So, these blood cells are subjected to electric field of particular varying intensity range to exert a force on the unwanted cells to separate them from the pure ones.

This process can also be used to diagnose the disease, by working on the same grounds. Actually as we discussed earlier, that electric field exerts a force depending upon the shape/size. The outcome of this statement is that, the bodies with different shapes interact differently with electric field lines. So from this difference of interaction we can determine the disease’s nature.

Another important implementation is to grow a particular structure on a silicon chip. This structure is grown so carefully by using state of the art techniques. The blood is forced to pass through this chip. Different blood particles interact differently with the structure on the chip depending upon their shape and size. This interaction is recorded by micro-controller embedded onto the chip and hence the disease is diagnosed.

Flexible Manufacturing Systems


Sections:

1.What is a Flexible Manufacturing System?

2.FMS Components

3.FMS Applications and Benefits

4.FMS Planning and Implementation Issues

5.Quantitative Analysis of Flexible Manufacturing Systems

Where to Apply FMS Technology

If

-the plant presently either:

–Produces parts in batches or

–Uses manned GT cells and management wants to automate the cells

-It must be possible to group a portion of the parts made in the plant into part families

–The part similarities allow them to be processed on the FMS workstations

-Parts and products are in the mid-volume, mid-variety production range

Flexible Manufacturing System - Defined

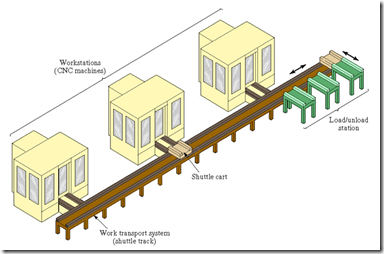
A highly automated GT machine cell, consisting of a group of processing stations (usually CNC machine tools), interconnected by an automated material handling and storage system, and controlled by an integrated computer system

-The FMS relies on the principles of GT

–No manufacturing system can produce an unlimited range of products

–An FMS is capable of producing a single part family or a limited range of part families

Flexibility Tests in an Automated Manufacturing System

To qualify as being flexible, a manufacturing system should satisfy the following criteria (“yes” answer for each question):

1.Can it process different part styles in a non‑batch mode?

2.Can it accept changes in production schedule?

3.Can it respond gracefully to equipment malfunctions and breakdowns?

4.Can it accommodate introduction of new part designs?

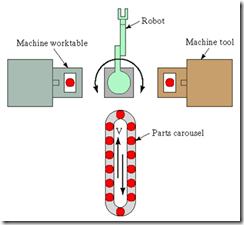
Automated manufacturing cell with two machine tools and robot. Is it a flexible cell?

Is the Robotic Work Cell Flexible?

image

1.Part variety test

–Can it machine different part configurations in a mix rather than in batches?

2.Schedule change test

–Can production schedule and part mix be changed?

-Is the Robotic Work Cell Flexible?

3.Error recovery test

-Can it operate if one machine breaks down?

•Example: while repairs are being made on the broken machine, can its work be temporarily reassigned to the other machine?

4.New part test

–As new part designs are developed, can NC part programs be written off‑line and then downloaded to the system for execution?

Types of FMS

Kinds of operations

–Processing vs. assembly

–Type of processing

If machining, rotational vs. non-rotational

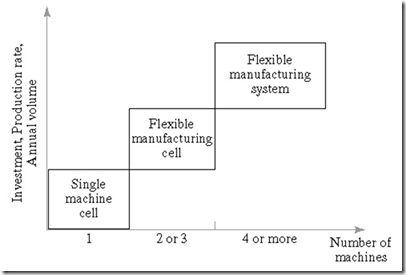
Number of machines (workstations):

1.Single machine cell (n = 1)

2.Flexible manufacturing cell (n = 2 or 3)

3.Flexible manufacturing system (n = 4 or more)

Single-Machine Manufacturing Cell

image

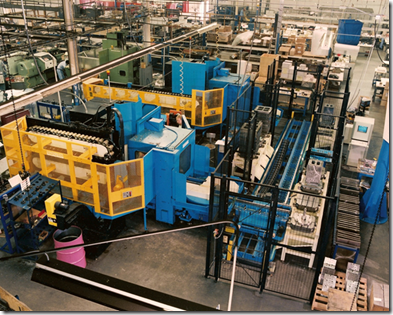
A single-machine CNC machining cell (photo courtesy of Cincinnati Milacron)

image

Flexible Manufacturing Cell

image

A two-machine flexible manufacturing cell for machining (photo courtesy of Cincinnati Milacron)

image

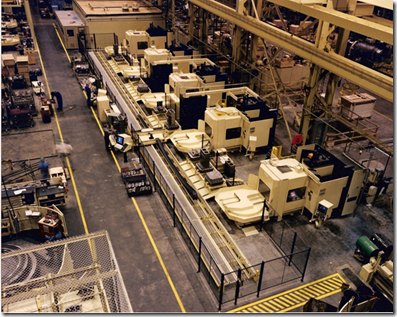
A five-machine flexible manufacturing system for machining (photo courtesy of Cincinnati Milacron)

image

Features of the Three Categories

image

FMS Types
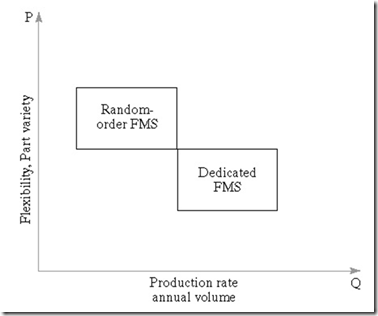
Level of Flexibility

1.Dedicated FMS

–Designed to produce a limited variety of part styles

–The complete universe of parts to be made on the system is known in advance

–Part family likely based on product commonality rather than geometric similarity

2.Random-order FMS

–Appropriate for large part families

–New part designs will be introduced

–Production schedule is subject to daily changes

•Dedicated vs. Random-Order FMSs

image

FMS Components

1.Workstations

2.Material handling and storage system

3.Computer control system

4.Human labor

Workstations

•Load and unload station(s)

–Factory interface with FMS

–Manual or automated

–Includes communication interface with worker to specify parts to load, fixtures needed, etc.

•CNC machine tools in a machining type system

–CNC machining centers

–Milling machine modules

–Turning modules

•Assembly machines

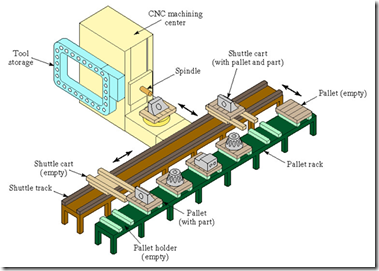
Material Handling and Storage

Functions:

–Random, independent movement of parts between stations

–Capability to handle a variety of part styles

•Standard pallet fixture base

•Workholding fixture can be adapted

–Temporary storage

–Convenient access for loading and unloading

–Compatibility with computer control

•Material Handling Equipment

•Primary handling system establishes basic FMS layout

•Secondary handling system - functions:

–Transfers work from primary handling system to workstations

–Position and locate part with sufficient accuracy and repeatability for the operation

–Reorient part to present correct surface for processing

–Buffer storage to maximize machine utilization

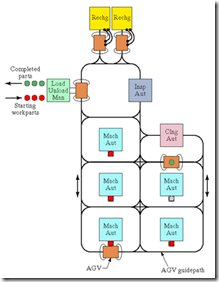
Five Types of FMS Layouts

•The layout of the FMS is established by the material handling system

Five basic types of FMS layouts

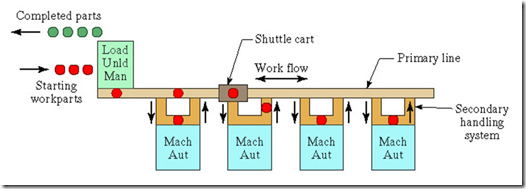
1.In‑line

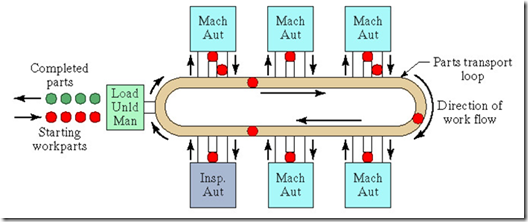
2.Loop

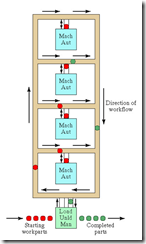
3.Ladder

4.Open field

5.Robot‑centered cell

FMS In-Line Layout

image

image

•Straight line flow, well-defined processing sequence similar for all work units

•Work flow is from left to right through the same workstations

•No secondary handling system

•Linear transfer system with secondary parts handling system at each workstation to facilitate flow in two directions

FMS Loop Layout

image

•One direction flow, but variations in processing sequence possible for different part types

•Secondary handling system at each workstation

•FMS Rectangular Layout

image

•Rectangular layout allows recirculation of pallets back to the first station in the sequence after unloading at the final station

FMS Ladder Layout

image

•Loop with rungs to allow greater variation in processing sequence

FMS Open Field Layout

image

•Multiple loops and ladders, suitable for large part families

Robot-Centered Cell

image

•Suited to the handling of rotational parts and turning operations

FMS Computer Functions

1.Workstation control

–Individual stations require controls, usually computerized

2.Distribution of control instructions to workstations

–Central intelligence required to coordinate processing at individual stations

3.Production control

–Product mix, machine scheduling, and other planning functions

4.Traffic control

–Management of the primary handling system to move parts between workstations

5.Shuttle control

–Coordination of secondary handling system with primary handling system

6.Workpiece monitoring

–Monitoring the status of each part in the system

•FMS Computer Functions

7.Tool control

–Tool location

•Keeping track of each tool in the system

–Tool life monitoring

•Monitoring usage of each cutting tool and determining when to replace worn tools

8.Performance monitoring and reporting

–Availability, utilization, production piece counts, etc.

9.Diagnostics

–Diagnose malfunction causes and recommend repairs

Duties Performed by Human Labor

•Loading and unloading parts from the system

•Changing and setting cutting tools

•Maintenance and repair of equipment

•NC part programming

•Programming and operating the computer system

•Overall management of the system

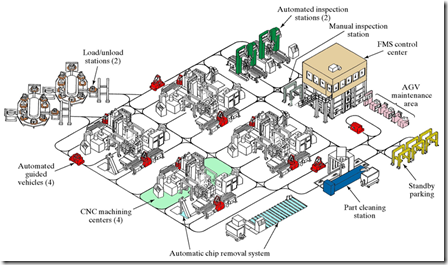
FMS Applications

•Machining – most common application of FMS technology

•Assembly

•Inspection

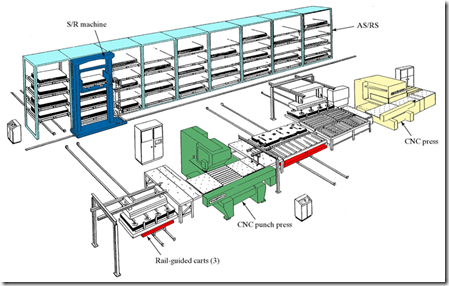
•Sheet metal processing (punching, shearing, bending, and forming)

•Forging

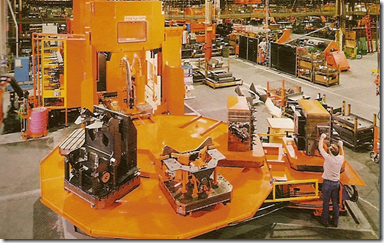
FMS at Chance-Vought Aircraft (courtesy of Cincinnati Milacron)

image

FMS for Sheet Metal Fabrication

image

FMS Benefits

•Increased machine utilization

–Reasons:

•24 hour operation likely to justify investment

•Automatic tool changing

•Automatic pallet changing at stations

•Queues of parts at stations to maximize utilization

•Dynamic scheduling of production to account for changes in demand

•Fewer machines required

•Reduction in factory floor space required

•FMS Benefits

•Greater responsiveness to change

•Reduced inventory requirements

–Different parts produced continuously rather than in batches

•Lower manufacturing lead times

•Reduced labor requirements

•Higher productivity

•Opportunity for unattended production

–Machines run overnight ("lights out operation")

FMS Planning and Design Issues

•Part family considerations

–Defining the part family of families to be processed

•Based on part similarity

•Based on product commonality

•Processing requirements

–Determine types of processing equipment required

•Physical characteristics of workparts

–Size and weight determine size of processing equipment and material handling equipment

•Production volume

–Annual quantities determined number of machines required

•Types of workstations

•Variations in process routings

•Work-in-process and storage capacity

•Tooling

•Pallet fixtures

FMS Operational Issues

•Scheduling and dispatching

–Launching parts into the system at appropriate times

•Machine loading

–Deciding what operations and associated tooling at each workstation

•Part routing

–Selecting routes to be followed by each part

•FMS Operational Issues

•Part grouping

–Which parts should be on the system at one time

•Tool management

–When to change tools

•Pallet and fixture allocation

–Limits on fixture types may limit part types that can be processed

•Quantitative Analysis of
Flexible Manufacturing Systems

•FMS analysis techniques:

1.Deterministic models

2.Queueing models

3.Discrete event simulation

4.Other approaches, including heuristics

•Deterministic models

1.Bottleneck model - estimates of production rate, utilization, and other measures for a given product mix

2.Extended bottleneck model - adds work-in-process feature to basic model

•For a given part mix, the total production rate is ultimately limited by the bottleneck station

•If part mix ratios can be relaxed, it may be possible to increase total FMS production rate by increasing the utilization of non-bottleneck stations

•As a first approximation, bottleneck model can be used to estimate the number of servers of each type to achieve a specified overall production rate


Fused Deposition Modeling: Summary + Process

After analyzing the steps involved in rapid prototyping, let us move to an important rapid prototyping process: Fused Deposition Modeling (FDM).

Actually FDM is the second most widely used rapid prototyping technology. In it a plasitc filament is melted down and this melted plastic is sent to a nozzle. This nozzle extrudes the melted plasitc by moving in a plane. Due to simultaneous action of movement and extrusion a thin layer is formed. This melted plastic solidifies immediately. ABS is the most suitable plastic for this process. Sometimes a companion material is introduced to support the layer of melted plastic. This companion material also enhances the temperature bearing capacity and strength of the solidified layer. We can implement this method for the manufacture of small products also. Here is a brief review of procedural steps of FDM:

A CAD file is converted into .stl format. This file is sliced into layers. At the same time, tool path is programmed using SML language. Molten plastic is extruded out of a nozzle which is moving along the path programmed earlier. Another nozzle is used to extrude the companion material. Layers formed according to the inputted sliced model. These layers fused together to build up the 3D model of the design. After that companion material is removed, and the model is ready after removal from the fabrication platform.

Material Used in FDM process: Acrylonitrile Butadiene Styrene (ABS)

The chemical formula of this material is : C8H8 . C4H6 . C3H3N. This material is light and rigid. It is a synthetic monomer. The main advantage of ABS is that it combines the strength and rigidity of acrylonitrile and styrene with toughness of polybutadiene. Here are some advantages of FDM:

This process is speedy, safe, environment friendly, clean, simple, easy and cost effective. Also no material removal is required. On the other hand the disadvantage of this process is: poor strength in vertical direction, slow for big part and accuracy is low.

The major problem to FDM is that the 3-D files we found are not always transferable to sliced model.

FDM begins with a software process which processes an STL file (stereolithography file format), mathematically slicing and orienting the model for the build process. If required, support structures may be generated. The machine may dispense multiple materials to achieve different goals: For example, one may use one material to build up the model and use another as a soluble support structure, or one could use multiple colors of the same type of thermoplastic on the same model.

The model or part is produced by extruding small beads of thermoplastic material to form layers as the material hardens immediately after extrusion from the nozzle.

A plastic filament or metal wire is unwound from a coil and supplies material to an extrusion nozzle which can turn the flow on and off. There is typically a worm-drive that pushes the filament into the nozzle at a controlled rate.

The nozzle is heated to melt the material. The thermoplastics are heated past their glass transition temperature and are then deposited by an extrusion head.

The nozzle can be moved in both horizontal and vertical directions by a numerically controlled mechanism. The nozzle follows a tool-path controlled by a computer-aided manufacturing (CAM) software package, and the part is built from the bottom up, one layer at a time. Stepper motors or servo motors are typically employed to move the extrusion head. The mechanism used is often an X-Y-Z rectilinear design, although other mechanical designs such as deltabot have been employed.

Although as a printing technology FDM is very flexible, and it is capable of dealing with small overhangs by the support from lower layers, FDM generally has some restrictions on the slope of the overhang, and cannot produce unsupported stalactites.

Myriad materials are available, such as ABS, PLA, polycarbonate, polyamides, polystyrene, lignin, among many others, with different trade-offs between strength and temperature properties

COMBINED LOADING

PRACTICALLY IT CAN BE OBSERVED THAT STRUCTURAL MEMBERS / COMPONENTS ARE REQUIRED TO RESIST MORE THAN ONE TYPE OF LOADING. FOR EXAMPLE, A SHAFT IN TORSION MAY ALSO BE SUBJECTED TO BENDING, OR A BEAM MAY BE SUBJECTED TO THE SIMULTANEOUS ACTION OF THE BENDING MOMENTS AND AXIAL FORCES. THE STRESS ANALYSIS OF A MEMBER SUBJECTED TO SUCH LOADING CONDITIONS (COMBINED LOADINGS) CAN BE CARRIED OUT BY SUPERIMPOSING THE STRESSES DUE TO EACH LOAD ACTING SEPARATELY. HOWEVER, SUPERIMPOSING CAN ONLY BE PERFOMED IF THE STRESSES ARE LINEAR FUNCTIONS OF THE LOADS AND IF THERE IS NO INTERACTION EFFECTS BETWEEN VARIOUS LOADS. SUCH TYPE OF SITUATION CAN ONLY BE ACHIEVED IF THE DEFLECTIONS AND ROTATIONS OF THE STRUCTURES ARE SMALL. ANALYSIS BY THE PROCESS OF SUPERIMPOSING BEGINS WITH THE DETERMINATION OF THE STRESSES DUE TO THE AXIAL FORCES, TORQUES, SHEAR FORCES, AND BENDING MOMENTS. AFTER DETERMINATION THESE STRESSES ARE COMBINED TO OBTAIN THE RESULTANT STRESSES, AFTER WHICH THE STRESSES ACTING IN INCLINED DIRECTIONS ARE INVESTIGATED BY STRESS TRANSFORMATION EQUATIONS. FINALLY THE PRINCIPAL STRESSES AND MAXIMUM SHEAR STRESSES DUE TO COMBINED LOADING ARE DETERMINED. IN BRIEF THE FOLLOWING THREE-STEP PROCEDURE WILL BE USEFUL IN SOLVING FOR STRESSES DUE TO COMBINED LOADING

image

1. DETERMINE THE INTERNAL RESULTANTS

THIS INVOLVES DRAWING FREE-BODY DIAGRAM AND WRITING EQUILIBRIUM EQUATIONS AS HAD BEEN DISCUSSED IN CASE OF INDETERMINATE STRUCTURES.

2. CALCULATE THE INDIVIDUAL STRESSES

FORMULAS AS LISTED BELOW ARE USED TO COMPUTE THE STRESS DISTRIBUTIONS THAT RESULT FROM THE VARIOUS STRESS RESULTANTS.

STRESS RESULTANT

SYMBOL

FORMULA

NORMAL FORCE

F

σ = F/A

TORSIONAL MOMENT

T

τ = Tρ / Ip

BENDING MOMENT

M

σ = My/I

TRANSVERSE SHEAR FORCE

V

τ = VQ / It

3. COMBINE THE INDIVIDUAL STRESSES

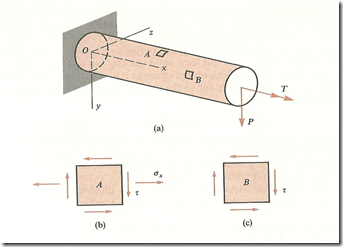
THIS STEP GENERALLY INVOLVES ALGEBRICALLY SUMMING LIKE STRESSES AND IN MOST CASES PRINCIPAL STRESSES AND MAXIMUM SHEAR STRESSES ARE CALCULATED. CONSEQUENTLY, EITHER THE ADEQUACY OF THE DESIGN IS CONFIRMED, OR IF THE STRESSES ARE TOO LARGE OR TOO SMALL DESIGN CHANGES NEEDED ARE IDENTIFIED. TO ELABORATE THIS DEFINED MECHANISM OF ANALYSIS, LET US CONSIDER A SOLID CIRCULAR CANTILEVER BAR. THIS BAR IS LOADED AT THE FREE END BY A TWISTING COUPLE “T” AND A LATERAL LOAD “P” WHICH CAUSES BENDING. THESE TWO LOADS PRODUCE A BENDING MOMENT (M), A SHEAR FORCE (V), AND A TWISTING COUPLE (T) AT EVERY X-SECTION OF THE STRUCTURE, EACH OF WHICH PRODUCES STRESSES ACTING OVER THE CROSS SECTIONS.

MOREOVER, BENDING MOMENT (M), SHEAR FORCE (V) AND TWISTING COUPLE (T) PRODUCE STRESSES ACTING OVER THE CROSS SECTIONS OF THE STRUCTURES. NOW IF WE ISOLATE STRESS ELEMENT “A” AT THE TOP OF THE BAR, IT CAN BE OBSERVED THAT THIS ELEMENT IS SUBJECTED TO BENDING AND SHEAR STRESSES WHICH CAN BE CALCULATED BY THE FOLLOWING RELATIONSHIPS:

σx = M r/ I AND τ = T r / Ip

IT CAN ALSO BE OBSERVED THAT AT THE TOP OF THE ELEMENT THERE ARE NO SHEAR STRESSES ASSOCIATED WITH SHEAR FORCE “V”. THUS A PLANE STRESS SITUATION IS OBTAINED. AFTER DETERMINING THE VALUES OF “σx” AND “τ”, WE CAN DETERMINE THE STRESSES ON AN ELEMENT ROTATED THROUGH ANY DESIRED ANGLE. THEREFORE, THE MAXIMUM AND MINIMUM NORMAL STRESSES AT POINT “A”, IN OTHER WORDS THE PRINCIPAL STRESSES, AND ALSO THE MAXIMUM SHEAR STRESS CAN OBTAINED BY THE FOLLOWING RELATIONSHIPS:

σ1,2 = σx /2 ± √(σx/2)² + τ²

τmax = √(σx/2)² + τxy²

THESE CALCULATED MAXIMUM VALUES OF STRESSES CAN BE COMPARED WITH THE ALLOWABLE NORMAL AND SHEAR STRESSES WHILE CHECKING THE ADEQUACY AND RELIABILITY OF BAR. IT MUST ALSO BE OBSERVED THAT THE STRESSES ARE LARGEST WHEN THE ELEMENT “A” IS LOCATED AT THE FIXED END OF THE BEAM WHERE THE BENDING MOMENT HAS ITS MAXIMUM VALUE. HENCE THE TOP OF THE BEAM AT THE SUPPORT IS ONE OF THE CRITICAL POINTS WHERE THE STRESSES MUST BE INVESTIGATED. ANOTHER CRITICAL POINT IS ON THE SIDE OF THE BAR AT THE NEUTRAL AXIS . AT THIS POINT THE BENDING STRESS IS ZERO BUT THE SHEAR STRESS PRODUCED BY THE SHEAR FORCE “V” HAS ITS LARGEST VALUE. THIS MEANS THAT THIS IS THE STATE OF PURE SHEAR WITH RESULTANT SHEAR STRESS CONSISTING OF TWO PARTS; FIRST THE SHEAR STRESS DUE TO THE TORQUE AND THE OTHER DUE TO THE SHEAR FORCE “V”. SHEAR STRESS DUE TO THE TORQUE “T” AND SHEAR STRESS DUE TO THE SHEAR FORCE ”V” APPLIED ON THE SHAFT CAN BE OBTAINED BY THE FOLLOWING RELATIONSHIPS: (SOLID SHAFT IN CASE OF SHEAR FORCE)

τ1 = Tr/Ip AND τ2 = 4V / 3A

TOTAL SHEAR STRESS = τ = τ1 + τ2

AS THE PRINCIPAL STRESSES OCCUR ON PLANES AT 45º TO THE AXIS AND HAVE THE SAME MAGNITUDES AS THE SHEAR STRESS ITSELF. THEREFORE,

σ1,2 = ±τ

THESE MAXIMUM NORMAL AND SHEAR STRESSES SHOULD BE COMPARED WITH THOSE OBTAINED FOR ELEMENTS AT THE TOP AND BOTTOM OF THE BAR IN ORDER TO ASCERTAIN THE ABSOLUTE MAXIMUM STRESSES FOR USE IN DESIGN. IN FACT THE VARIETY OF PRACTICAL SITUATIONS IS SEEMINGLY ENDLESS, SO IT NOT WORTHWHILE TO DERIVE SPECIFIC FORMULAS FOR DESIGN USE. INSTEAD IN CASE OF COMBINED LOADING EACH STRUCTURE IS ANALYZED AT VARIOUS CRITICAL POINTS AND THE RESULTS ARE COMPARED. WHEN SELECTING THE POINTS TO BE INVESTIGATED, IT IS NATURAL TO CHOOSE THOSE LOCATIONS WHERE EITHER THE NORMAL OR THE SHEAR STRESSES ARE MAXIMUM.

CAD of a specific blade using Pro-E

What is CAD?

Computer-aided design (CAD) is the use of computer systems to assist in the creation, modification, analysis, or optimization of a design. CAD software is used to increase the productivity of the designer, improve the quality of design, improve communications through documentation, and to create a database for manufacturing. CAD output is often in the form of electronic files for print, machining, or other manufacturing operations.

Computer-aided design is used in many fields. Its use in designing electronic systems is known as Electronic Design Automation, or EDA. In mechanical design it is known as Mechanical Design Automation (MDA) or computer-aided drafting (CAD), which includes the process of creating a technical drawing with the use of computer software.

CAD software for mechanical design uses either vector-based graphics to depict the objects of traditional drafting, or may also produce raster graphics showing the overall appearance of designed objects. However, it involves more than just shapes. As in the manual drafting of technical and engineering drawings, the output of CAD must convey information, such as materials, processes, dimensions, and tolerances, according to application-specific conventions.

CAD may be used to design curves and figures in two-dimensional (2D) space; or curves, surfaces, and solids in three-dimensional (3D) space.

CAD is an important industrial art extensively used in many applications, including automotive, shipbuilding, and aerospace industries, industrial and architectural design, prosthetics, and many more. CAD is also widely used to produce computer animation for special effects in movies, advertising and technical manuals, often called DCC Digital content creation. The modern ubiquity and power of computers means that even perfume bottles and shampoo dispensers are designed using techniques unheard of by engineers of the 1960s. Because of its enormous economic importance, CAD has been a major driving force for research in computational geometry, computer graphics (both hardware and software), and discrete differential geometry.

The design of geometric models for object shapes, in particular, is occasionally called computer-aided geometric design (CAGD).

While the goal of automated CAD systems is to increase efficiency, they are not necessarily the best way to allow newcomers to understand the geometrical principles of Solid Modeling. For this, scripting languages such as PLASM (Programming Language of Solid Modeling) are more suitable.

Let us create the 3D model of a blade by using PRO-Engineer, but it is necessary to know what is PRO-Engineer ( if you are a beginner)

Pro-Engineer:

PTC Creo, formerly known as Pro/ENGINEER is a parametric, integrated 3D CAD/CAM/CAE solution created by Parametric Technology Corporation (PTC). It was the first to market with parametric, feature-based, associative solid modeling software. The application runs on Microsoft Windows platform, and provides solid modeling, assembly modelling and drafting, finite element analysis, Direct and Parametric modelling, Sub-divisional and nurbs surfacing and NC and tooling functionality for mechanical engineers. It features a suite of 10 Apps which are work within the same program. Versions for UNIX systems were discontinued with the release of version 4.0, except Solaris on x86-64.

The Pro/ENGINEER name was changed to Creo Elements/Pro, also known as Wildfire 5.0 on October 28, 2010, coinciding with PTC’s announcement of Creo, a new design software application suite. Creo Elements/Pro will be discontinued after version 2 in favour of the Creo design suite.

Creo Elements/Pro and now Creo Parametric competes in the market with CATIA and NX (Unigraphics) and Solidworks.


Let us create the 3D model of the drawing step by step using pro engineer. Here is a model of a specific blade with given dimensions, let us start:

Given drawing:

image

Given Dimensions:

R1= 150

R2= 99

Beta=30

AC=BC=48.87

δ = 73.48

Step by Step procedure ………..

Step 1: Open the Pro-Engineer
image

Step 2: Choose a particular sketch

image
Step 3: Draw a circle with ‘99’ radius

image
Step 4: Draw a circle with ‘150’ radius
image

Step 5: Draw a vertical line

image
Step 6: Draw another line with ’30 degree’ angle

image
Step 7: Change the length to ’48.87’
image

Step 8: From that draw another line with ’73.48 degree’

image
Step 9: Change the length to ’48.87’ also

image
Step 10: Draw a circle which pass through the two points

image
Step 11: Offset the curve to ‘5’

image
Step 12: Trim the remaining unnecessary sketch

image

Step 13: Extrude the curve

image

So it is complete now. Hope you enjoy the tutorial.